This post is all about the chocolate mousse recipe I have recently fallen in love with. There is no raw eggs, gelatin, and additional sugar added to the mousse (click here for another rich chocolate mousse recipe containing eggs). Simple ingredients. Awesome flavor. This recipe originated from the Triple Chocolate Mousse Cake (from Cook’s Illustrated) that I’ve made several times before (see my Halloween Graveyard cake here). For my own version, since I don’t have a sweet tooth, I have replaced semi-sweet chocolate chips with premium dark chocolate and also left out the sugar from the original recipe. Secret ingredients (oh well just espresso powder and vanilla bean paste) have been added to enhance the chocolate flavor. You may wonder why I include espresso powder in my recipe but believe it or not, adding just a tiny amount of coffee will make your dark chocolate dessert taste much better without tasting the coffee at all! Try adding some espresso powder to your own chocolate dessert recipe and see if it tastes better or not. Another technique worth mentioning is about the “blooming” of cocoa powder. Hot water (or coffee in some other recipes) is used to dissolve the cocoa powder. David Lebovitz explains in his article Cocoa Powder FAQ: Dutch-process & natural cocoa powder that “this is done to intensify the flavor of the cocoa powder by releasing flavor particles trapped in the cocoa powder, and helps them burst forth”.
這是EC近期愛上的朱古力慕絲食譜,沒有使用生雞蛋及魚膠粉,連糖也沒有加(含蛋的特濃朱古力慕絲蛋糕食譜請到這裏),材料簡單,味道卻十分軟滑。食譜源自Cook’s Illustrated的Triple Chocolate Mousse Cake,此食譜EC試做過幾次(詳情可到這裏看哈佬喂墳墓蛋糕),後來依自己“愛朱古力的香但怕它的甜”的口味調整了份量,捨棄原食譜的半甜朱古力片而改用優質黑朱古力,連糖也不加了,加入了秘密材料改良配方後,便演變成現在你們看到的食譜!所謂的“秘密材料”其實是能提升黑朱古力味道的咖啡粉及香草醬,你或許會對咖啡粉存疑,但這麼少少的咖啡粉加在朱古力裏是察覺不到的。若你有常用的朱古力甜品食譜,你也可以加入少量咖啡粉看看味道會不會更好。值得一提的另一個技巧是能令可可粉味道更上一層樓的“blooming”:用熱水(有些食譜會用熱咖啡)沖泡無糖可可粉,David Labovitz在其網誌Cocoa Powder FAQ: Dutch-process & natural cocoa powder解釋:這能釋放被困在可可粉內的味道粒子,協助它們破出來,強化可可粉的味道。
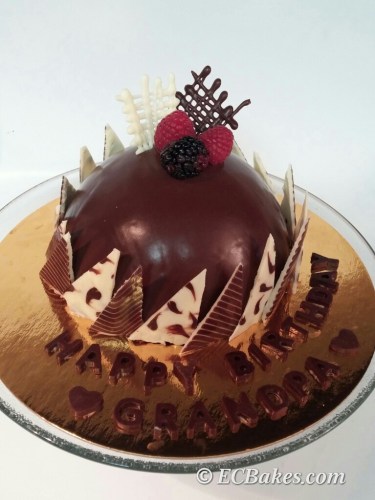
Dark Chocolate Mousse Dome With Lacquer Glaze
黑朱古力慕絲半球鏡面蛋糕
For The Chiffon Cake:
Recipe from Vanilla Chiffon Cake. This is half a batch.
Batter
Cake flour 40 g
Egg yolks, large 2 (about 30 to 35 g)
Milk 25 g
Canola oil or vegetable oil 25 g
Vanilla bean paste or pure vanilla extract 1/2 tsp
Meringue
Egg whites, large 2 (about 60 g)
Sugar 30 g
Cream of tartar 1/4 tsp
Directions:
Preheat oven to 325ºF/160ºC. Separate egg whites and egg yolks.
To make the batter: Place cake flour in a mixing bowl. Make a well in the centre. Add oil, milk, vanilla bean paste and egg yolks in the well and whisk gently until smooth.
To make the meringue, wipe the mixer bowl and wire beater with paper towel and vinegar or lemon juice to remove traces of grease. Whip egg whites until foamy. Add cream of tartar (to stabilize the meringue) and continue to beat egg white until soft peaks forms. Then slowly add sugar in batches and continue beating until glossy and almost firm peaks form. When you lift the whisk, the peak will hold its pointy shape but the tip will fall back very slightly. Do not whip to dry peaks or else it will be hard to incorporate meringue to the batter.
Scoop about one third of the meringue into the yolk batter and mix well to lighten. Then pour this back to the remaining meringue. Fold gently and thoroughly until you see no streaks of white. Pour batter into an unprepared 6-inch round cake pan (you may line the bottom of the pan with parchment paper though)and smooth the top with an offset spatula . Tap pan against the kitchen counter several times to get rid of any large air bubbles.
Bake for 15 to 20 minutes or until cake is done (cake will spring back when touched…every oven is different so adjust your time accordingly). Drop pan on the kitchen counter at a distance upon removal from the oven. This will release any gas trapped in the cake cells and make shrinkage more uniform. Place inverted cake pan on a cooling rack to cool completely before unmolding.
雪芳蛋糕
食譜來自雲尼拿雪芳,這是一半份量
蛋黃楜
低筋麵粉 40 克
大蛋蛋黃 2 顆 (約30-35 克)
牛奶 25 克
芥花油或菜油 25 克
香草醬或純雲尼拿油 1/2 茶匙
蛋白霜
大蛋蛋白 2 顆 (約60 克)
糖 30 克
他他粉 1/4 茶匙
做法:
焗爐預熱325ºF/160ºC,分開蛋白和和蛋黃
做蛋黃糊:低筋麵粉過篩放入鋼盆,將粉往周圍撥成粉牆狀,油、牛奶、香草醬及蛋黃倒入粉牆中央,用蛋拂混合成蛋黃糊備用
做蛋白霜:鋼盤及打蛋器配件先用檸檬汁或白醋抹一次去除殘餘油份,蛋白以打蛋器打至起泡,加入他他粉繼續打至泡泡變細密,分次加糖打至企身,拉起打蛋器蛋白霜末端微微下垂呈小彎勾狀(蛋白霜打得過硬會比較難與蛋黃糊混合)
將三分一蛋白霜混入蛋黃糊中充份拌勻,再將麵糊倒入餘下的蛋白霜中輕手以切拌方法混合至麵糊成均一顔色,盡量輕手並快手完成混合以免蛋白霜消泡
麵糊倒入6吋圓形烤模中(烤模底部可放牛油紙,但內側切勿抹油或墊紙,否則影響麵糊往上爬升), 抹平麵糊表面,將烤模住桌上輕敲幾下敲出較大的氣泡
放入焗爐15至20分鐘或至熟(用手按蛋糕面會回彈,不同焗爐可能要不同時間,請自行調節), 取出後將蛋糕連烤模從高處跌下將困於蛋糕內的空氣震破避免蛋糕嚴重回縮,於鐵架倒扣放涼後可脱模
For The Dark Chocolate Mousse:
Recipe inspired by Triple Chocolate Mousse Cake from Cook’s Illustrated
Unsweetened cocoa powder 6 g (1 Tbsp)
Hot water 30 g
Salt 1/16 tsp
Bittersweet chocolate (58% or higher) 100 g
Instant espresso powder 1/4 tsp (1/2 to 1 tsp for mocha mousse )
Vanilla bean paste or pure vanilla extract 1/2 tsp
Whipping cream 180 g
Directions:
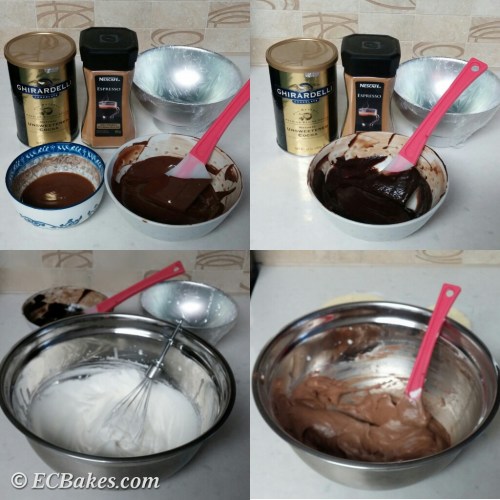
Chill mixing bowl and whisk attachment in the freezer for at least 10 minutes. Mix cocoa powder, espresso powder, salt, vanilla bean paste and hot water together in a small bowl and set aside.
In a microwave safe bowl, melt chocolate with medium power in the microwave (or melt chocolate over a double broiler). Stir in cocoa powder mixture and let cool to room temperature.
Whisk whipping cream in the chilled mixing bowl until soft peaks form. Fold whipped cream into chocolate mixture in two batches until no white streaks remain.
黑朱古力慕絲
食譜參考和改良自Cook’s Illustrated的Triple Chocolate Mousse Cake
無糖可可粉 6 克 (約1湯匙)
熱水 30 克
鹽 1/16 茶匙
苦甜朱古力 (58%或以上濃度) 100 克
即溶特濃咖啡粉 1/4 茶匙 (莫卡慕絲可增至1/2至1茶匙)
香草醬或純雲尼拿油 1/2 茶匙
淡忌廉 180 克
做法:
鋼盆及打蛋器配件放冰箱至少十分鐘備用,無糖可可粉、咖啡粉、香草醬、鹽和熱水開勻放涼
黑朱古力隔水坐溶或放微波爐用中火(50%火力)叮溶,加入可可粉溶液拌勻放涼
淡忌廉倒入預先雪凍的鋼盆, 以打蛋器打至軟身呈軟勾狀,分兩次拌入朱古力糊,輕手混合成顔色均一的黑朱古力慕絲
For The Chocolate Lacquer Glaze
Recipe slightly adapted from Rose Levy Beranbaum’s book The Cake Bible. Mine is a double batch with reduced sugar.
Sugar 20 g
Water 80 g
Light corn syrup 80 g
Unsweetened cocoa powder 60 g
Whipping cream 80 g
Water (add to gelatin) 60 g
Powdered gelatin 6 g
Directions:
Bloom gelatin powder by sprinkling it over water. Let stand for 5 minutes. Warm mixture in the microwave or over hot water when ready to use.
Combine sugar, water, light corn syrup and sifted cocoa powder in a saucepan and mix well. Heat on low until mixture bubbles (about 190ºF/88ºC). Remove from heat and stir in whipping cream.
When mixture has cooled slightly (about 122 to 140ºF/50 to 60ºC) , stir in warm gelatin mixture. Strain glaze into a measuring cup with a pour spout. Let cool to room temperature (about 85ºF/29ºC) before glazing. Leftover glaze can be kept in the freezer for months. Just bring it back to room temperature before reusing.
朱古力鏡面
食譜參考自Rose Levy Beranbaum的The Cake Bible,這是雙倍份量,減了糖量
糖 20 克
水 80 克
粟膠 80 克
無糖可可粉 60 克
淡忌廉 80 克
水 (加入魚膠粉) 60 克
魚膠粉 6 克
做法:
魚膠粉加水拌匀靜置五分鐘,用前隔水坐溶或叮溶
糖、水、粟膠及已過篩的無糖可可粉放小鍋拌勻,開小火煮至冒泡後(約190ºF/88ºC)離火,加淡忌廉拌勻
放至微暖後(約122至140ºF/50至60ºC)拌入魚膠溶液,過篩倒入尖嘴量杯,放至室溫後(約85ºF/29ºC)可淋上蛋糕面,剩餘的朱古力鏡面可放冰箱保存數月,使用前回温便可
To Assemble The Cake:
Slice cake horizontally in half and trim each layer to approximately 3.5 and 5.5 inch in diameter.
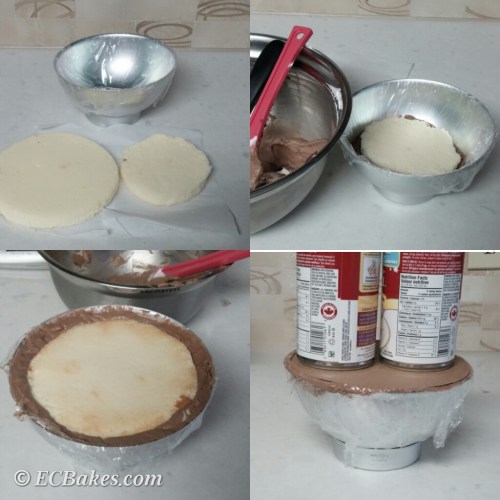
Line a half sphere cake mold with plastic wrap for easy removal (do not ignore this step. You will thank me when it comes to unmolding). I use the 3-D Sports Ball Pan Set from Wilton.
Pour in about 1/3 of the mousse. Place the smaller cake layer over the mouse and fill the mold with remaining mousse until it is almost full. Place the larger cake layer over the mousse, pressing firmly on the cake so it is completely surrounded by the mousse. Cover cake with plastic wrap and put an 6-inch cake board on top Put some weights over the cake board to make sure the cake is level. Chill cake (with weights on top) in the refrigerator until mousse is firm (about 30 to 40 minutes) or ready to glaze.
Place a cooling rack over a big plate (to catch any dripping). Remove the weights, cake board and plastic wrap from the chilled cake. Place the cake board back on top then flip the cake over. Remove cake pan (it will be very easy as it is lined with plastic wrap) and peel off plastic wrap. Sit cake on the cooling rack.
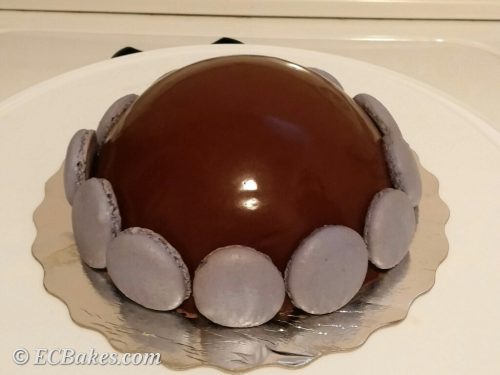
Pour room temperature lacquer glaze over the cake in a circular motion until the cake is entirely covered (extra glaze will drip off from the edges to the plate). Clean the edges then chill cake in the refrigerator until glaze is set. Garnish with other decorations.
組合蛋糕:
蛋糕橫切成兩片,修剪成兩片大約直徑3.5及5.5吋之蛋糕片
半圓蛋糕模內預先包保鮮紙方便脱模(不要輕視此步驟,到脱模時你會感激EC的小貼士),EC使用的是Wilton的半圓球形蛋糕模具
慕絲倒進模內至大約三份一滿,放上較小的蛋糕片壓實,倒進餘下慕絲至差不多全滿,將較大的蛋糕片完全壓進慕絲內,蓋上保鮮紙,放上六吋圓形蛋糕紙板,紙板上放如罐頭之類的重物(主要是讓蛋糕平均受力不會一高一低),將模連重物放入雪櫃雪實(約三十至四十分鐘)後可取出
預備一烤架,烤架下放一隻大碟收集滴下的朱古力鏡面,從雪櫃取出半圓蛋糕模,拿走重物、紙板及蛋糕面的保鮮紙,紙板放回蛋糕上,蛋糕連模反轉,除掉蛋糕模並撕去慕絲上的保鮮紙後放在烤架上
將室温的朱古力鏡面從蛋糕頂部中央打圈淋在蛋糕上直至整個蛋糕被鏡面覆蓋(鏡面會從蛋糕邊緣掉到碟上),清理好蛋糕邊後可將蛋糕放回雪櫃,鏡面凝固後可放其他裝飾。

Mocha mousse cake for my dad’s birthday. My lacquer glaze got screwed up when I tried to make it in the microwave. It lost its shine after being chilled.
爸爸的莫卡慕絲生日蛋糕,鏡面用微波爐煮的,鏡面凝固後失去了光澤,失敗了!
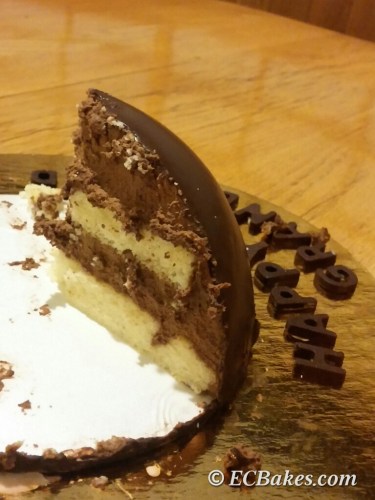
We cut the cake in a Japanese restaurant.
我們在日本餐廳切蛋糕
Click here for the chocolate triangles tutorial.
三角朱古力圍邊裝飾做法請參考這裡
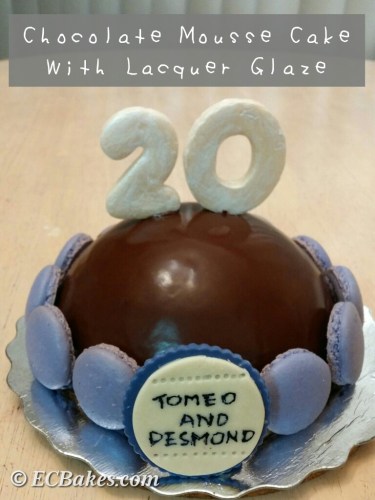
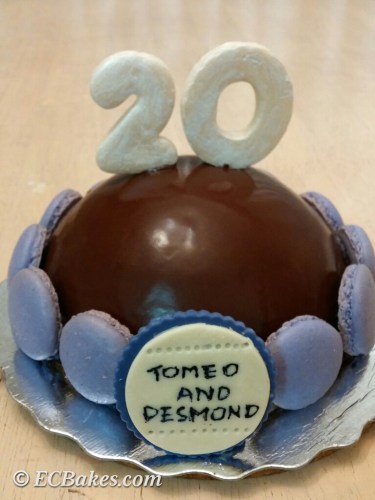
Birthday cake (chocolate mousse) for my hubby’s uncle and his son who has turned 20. This time I wasn’t lazy and made my lacquer glaze on the stove. I decorated the side with macaron shells. The cake topper and name plaque were made with modeling chocolate. Cake topper was painted with pearl dust and the names were written freehand.
老公的姨丈及其二十歲兒子的生日蛋糕,今次EC不敢偷懶,用回明火煮鏡面了!圍邊的是馬卡龍,數字蛋糕插牌及名牌用塑形朱古力做,數字插牌上掃了珍珠色粉,名字是手繪的
I used this pan set. The pans are 6 inches wide.
EC用這套模具,直徑6吋

If you want to republish this recipe, please link back to this post.
版權所有,如需引用,請註明出處
EC Bakes 小意思 Facebook 專頁 www.facebook.com/ECBakes
© Copyright 2015 ecbakes.com

多谢你分享·,好钟意!
LikeLike
Thanks Cynthia 😀
LikeLike