
I love moist, tender and fluffy cakes that are not overly sweet. Among the different types of cakes I’ve made, chiffon cakes perfectly fulfill my requirements! This pumpkin chiffon cake is based on my basic chiffon cake recipe. I used mami squash to make my puree this time (read about my homemade pumpkin puree post here). I found that mami squash is less watery than pumpkin and has a creamier texture. It actually tasted like roasted yams, but only sweeter. Another good thing about mami squash is that it can be easily mashed into puree with a fork.
EC喜歡吃鬆軟濕潤但不太甜的蛋糕, 在自己做過的蛋糕中, 只有雪芳蛋糕符合以上條件. 這個南瓜雪芳是在原味雪芳食譜加入南瓜泥(南瓜泥做法請到這裏). EC今次買了比南瓜甜及較少水份的媽咪瓜. 烤好的媽咪瓜口感較幼滑, 味道像煨蕃薯, 但比蕃薯更甜! 只用叉子壓已能輕易壓成泥, 不像南瓜般壓來壓去還是一絲絲的.
Pumpkin Chiffon Cake
南瓜戚風蛋糕
(makes a 7-inch cake 可做七寸蛋糕一個)
Ingredients 材料
Yolk Batter 蛋黃糊
Cake flour 低筋麵粉 75 g
Pumpkin puree, net weight 南瓜泥 (淨重) 65 g
Sugar 糖 10 g
Ground cinnamon 肉桂粉 1/8 tsp
Egg yolk, large 蛋黃(大蛋) 4
Milk 牛奶 55 g
Vegetable or canola oil 菜油或芥花籽油 50 g
Meringue 蛋白霜
Egg white, large 蛋白(大蛋) 4
Sugar 糖 55 g
Cream of tartar 他他粉 1/2 tsp
Directions 製作過程 :
Preheat oven to 325ºF/160ºC. Separate egg whites and egg yolks. Mash roasted or cooked pumpkin with a fork.
焗爐預熱至325ºF/160ºC. 分開蛋白和和蛋黃. 將烤好或煮好的南瓜壓成泥
To make the yolk batter: sift together the cake flour, cinnamon and sugar into a mixing bowl. Mix well and make a well in the centre. Add oil, milk, egg yolks, and pumpkin puree in the well and whisk gently until combined.
做蛋黃糊:將低筋麵粉、肉桂粉及糖混合過篩放進鋼盆中. 將粉往周圍撥成粉牆狀. 將油、牛奶、蛋黃及南瓜泥倒入粉牆中央, 輕手攪拌成蛋黃糊備用

To make the meringue, wipe the mixer bowl and wire beater with paper towel and vinegar or lemon juice to remove traces of grease. Whip egg whites until foamy. Add cream of tartar (to stabilize the meringue) and continue to beat egg white until soft peaks forms. Then slowly add sugar in batches and continue beating until glossy and firm peaks form. When you lift the whisk, the peak will hold it’s shape but the tip will fall back slightly.
做蛋白霜:鋼盤及打蛋器的頭先用檸檬汁或白醋抹一次去除殘餘油份
用打蛋器將蛋白打至起泡, 加入他他粉繼續打至泡泡變細密, 分次加糖打至濕性發泡(拉起打蛋器蛋白霜成小彎勾狀)

Scoop about one third of the meringue into the yolk batter and mix well to lighten. Then pour this back to the remaining meringue. Fold gently and thoroughly until you see no streaks of white. It will be done in about 15 to 20 strokes. Do not overmix or you will risk deflating your meringue.
將三分一蛋白霜混入蛋黃糊中充份拌勻, 再將蛋黃糊倒入餘下的蛋白霜中輕手以切拌方法混合至麵糊成均一的顔色. 盡量輕手並快手完成混合以免蛋白霜消泡, EC大約拌了十五至二十下


Pour batter into an unprepared 7-inch chiffon pan and smooth the top with a spatula. Tap pan against the kitchen counter several times to get rid of any large air bubbles.
將麵糊倒入七吋中空模中(烤模切勿抹油或墊紙, 否則影響麵糊往上爬升!), 用刮刀抹平麵糊表面, 將烤模住桌上輕敲幾下敲出較大的氣泡

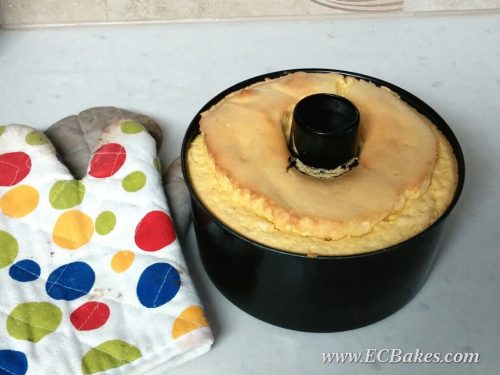
Bake for 30 to 35 minutes until cake is done (adjust baking time and temperature according to your own oven). To prevent sunken cake, drop the pan on the kitchen counter at a distance upon removal from the oven. This will release any gas trapped in the cake cells and make shrinkage more uniform. Invert the cake pan and cool on a cooling rack or a bottle. Once cooled, remove the chiffon cake by running a palette knife against the sides and bottom of the cake pan. I usually do this by hand to get a smooth finish.
放入焗爐焗30-35分鐘至熟(不同焗爐可能要不同時間. 請自行調節), 取出後將蛋糕連烤模從高處跌下將困於蛋糕內的空氣震破避免蛋糕回縮, 在鐵架或酒瓶上倒扣放涼後可用小刀協助甩模. EC用不留刀痕的徒手脱模方法

Note:
Recipe is based on my own vanilla chiffon cake recipe, which is adapted from 君之.
If you want to republish this recipe, please link back to this post.
版權所有,如需引用,請註明出處
EC Bakes 小意思 Facebook 專頁 www.facebook.com/ECBakes

Leave a comment