I created this cake for our family gathering during the weekend. Mirror glazed cakes have a stunning effect that can always impress your guests but, believe it or not, they are not hard to make at all! All you need is a frozen cake and a bowl of warm glaze (of course plus other simple equipment such as a spatula, a tall cup and a baking tray or plate to catch the drips).
週末家庭聚會時EC做了鏡面蛋糕,表面光滑如鏡的蛋糕十分吸引,但其實一點也不難操作!所需要的只是一個冷凍的蛋糕及一大碗暖淋面醬,當然也少不了其他簡單工具如抹刀、杯子及盛載滴落淋面的焗盆或碟子等等。
For me the key to success is to make sure the glaze is at the right temperature before use. The ideal working temperature is 86-95℉ (30-35℃). Too hot the glaze will be runny and possibly melt your cake. Too cold it will be thick and set up before covering the sides. I usually use mousse cake or cheesecake as the base. The cake has to be frozen so it won’t melt while the warm glaze is being poured over. Frozen cake also makes it easier to maneuver too. I learned it the hard way after making several stupid mistakes. There was one time that I tried to lift up my just-glazed cake to peek underneath out of curiosity. It simply slid and performed a 360 degree turn in the mid air, which was great in gymnastics, and landed on the ground upside down. It was one of the most devastating disasters in my baking life.
製作鏡面蛋糕必需注意淋面醬溫度,操作溫度要控制在86-95℉ (30-35℃),溫度過高淋面醬流動性太高會抓不住蛋糕,亦有機會把其表面融化;相反溫度過低淋面醬很快凝固,蛋糕表面不會光滑。EC一般使用慕絲蛋糕或芝士凍餅作底,蛋糕要預先冷凍才不易被溫熱的淋面醬融化,移除工作也方便得多,這是EC從慘痛經歷悟出的道理。在好奇心的驅使下EC曾高舉剛完成淋面的蛋糕察看底部,結果蛋糕從鋼架往下滑,在空中轉體一週後翻轉著地!從體操角度來看這旋轉是美妙的,但EC的蛋糕就因此而報銷了。
For a marble effect, you will need to color the glaze individually with different gel food colors. The recipe of the glaze was adopted from So Good and Southern Fatty. I was unable to take pictures while marbleizing the glaze. Describing the technique just in words is not sufficient so at the end of this post I will include some useful video tutorials from the internet.
製作大理石紋需分配淋面各自調色,配方參考自So Good和Southern Fatty。至於操作技巧方面,EC兼顧不了同時拍照及製作花紋,也實在很難純以文字描述,因此在文章末段附註了幾個網絡上的教學短片以供參考。
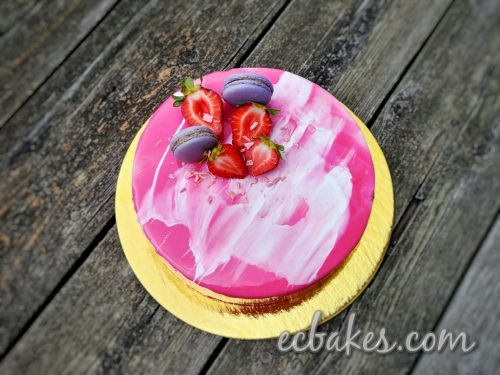
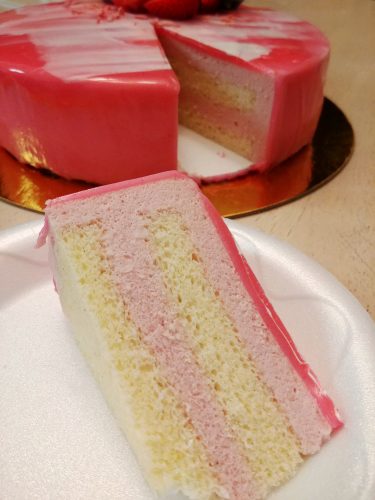
Strawberry Mousse Cake with Mirror Glaze
士多啤梨慕絲鏡面蛋糕
Makes 8” cake
八寸份量
Ingredients
For the Vanilla Chiffon Cake
80 g cake and pastry flour
4 large eggs, separated
50 g grapeseed oil
55 g milk
1 tsp vanilla bean paste or pure vanilla extract
50 g granulated sugar
1/2 tsp cream of tartar
Notes: the eggs i used are about 50 g without shells.
For the Strawberry Yogurt Mousse
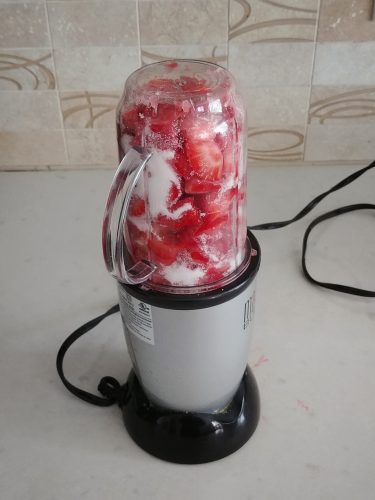
260 g strawberries, washed and diced
90 g plain yogurt
1 tsp lemon juice
60 to 80 g granulated sugar (adjust depending on ripeness of strawberries)
220 g whipping cream
15 g gelatin powder
75 g water
For the Mirror Glaze
100 g water
200 g granulated sugar
200 g light corn syrup
150 g sweetened condensed milk
200 g white chocolate, chopped
15 g gelatin powder
80 g water (mixed with gelatin powder)
Pink and white gel food coloring
材料
雲尼拿戚風蛋糕
低筋麵粉 80克
大蛋(分開蛋白和蛋黃) 4顆
葡萄籽油 50克
牛奶 55克
雲尼拿醬或純雲尼拿香油 1茶匙
細砂糖 50克
他他粉 1/2茶匙
註:EC使用的蛋每隻淨重約50克
士多啤梨乳酪慕絲
士多啤梨(洗淨切粒) 260克
原味乳酪 90克
檸檬汁 1茶匙
細砂糖 60至80克(依士多啤梨甜度增減)
淡忌廉 220克
魚膠粉 15克
水 75克
鏡面
水 100克
細砂糖 200克
粟膠 200克
煉奶 150克
白朱古力(切碎) 200克
魚膠粉 15克
水(加入魚膠粉) 80克
粉紅色及白色色膏
Directions 做法
For the Vanilla Chiffon Cake 雲尼拿戚風蛋糕
Please refer to Vanilla Chiffon Cake for a picture tutorial.
製作過程圖片可參考雲尼拿戚風蛋糕
Place sifted flour into a mixing bowl and make a well in the center. Add oil, milk, egg yolks and vanilla bean paste to the well and whisk gently until combined.
低筋麵粉過篩放入鋼盆中,中開一穴後倒入油、牛奶、蛋黃及雲尼拿醬,輕手用蛋拂攪拌均勻成蛋黃糊備用。
In a clean, separate mixing bowl, whip egg whites with a hand mixer or stand mixer fitted with the whisk attachment until foamy. Add cream of tartar and continue beating until soft peaks form. Gradually add sugar in batches and continue beating until glossy and firm peaks form. Scoop about one third of the meringue to the yolk mixture and mix well to lighten. Then pour this back to the remaining meringue. Fold gently and thoroughly until homogeneous.
取另一清潔的鋼盆放入蛋白,用電動打蛋器或座枱式攪拌機(使用打蛋器配件)將蛋白打至起泡後加入他他粉繼續打至泡泡變細密,分次加糖打至企身接近乾性發泡,將三分一蛋白霜混入蛋黃糊中充份拌勻,再將麵糊倒入餘下的蛋白霜中用膠刮輕手以切拌方法混合至麵糊顔色均一。
Pour batter into a 8” parchment paper lined round cake pan and smooth top with a spatula. Tap pan against the kitchen counter several times to get rid of any large air bubbles. Bake in a 325°F/160°C preheated oven until a wooden skewer inserted into the center of cake comes out clean, about 30 to 35 minutes for my oven. Invert pan and cool completely on a cooling rack before unmolding. Slice cake into two half-inch layers. Keep covered with plastic wrap until ready to use.
將麵糊倒入已墊底紙的八寸圓模中,用刮刀抹平麵糊表面,將模往枱上輕敲幾下敲出較大的氣泡,放入325°F/160°C預熱焗爐焗至竹籤插入蛋糕中央取出不沾麵糊,EC家中焗爐約需30至35分鐘,取出倒扣在鋼架放涼後可脫模,橫切成兩片半寸厚蛋糕片,以保鮮紙蓋好備用。
For the Strawberry Mousse 士多啤梨慕絲
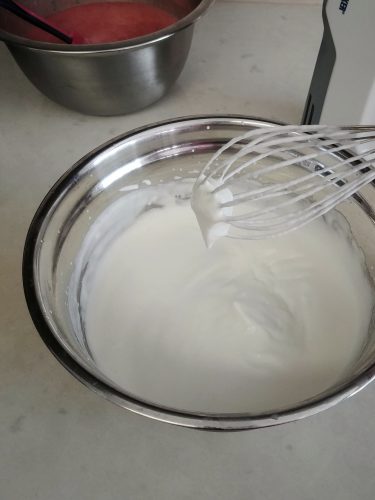
Chill mixing bowl and the whisk attachment in the freezer for 10 minutes before you start. Bloom gelatin by mixing it with water and set aside for 5 minutes. Warm mixture in the microwave or sit the bowl in hot water until gelatin is liquefied. Set aside.
鋼盆及打蛋器配件預先放冰箱十分鐘雪凍,小碗內放魚膠粉和水拌勻,靜置五分鐘讓魚膠粉充份吸收水份,隔熱水坐溶或放微波爐叮溶備用。
With a food processor or blender, process strawberries, yogurt, lemon juice and sugar until smooth. Strain mixture and pour into a mixing bowl. Stir in the gelatin mixture then set aside.
士多啤梨、乳酪、檸檬汁和糖放入攪拌機或食物處理器打滑,過篩倒進鋼盆中,加入魚膠溶液拌勻備用。

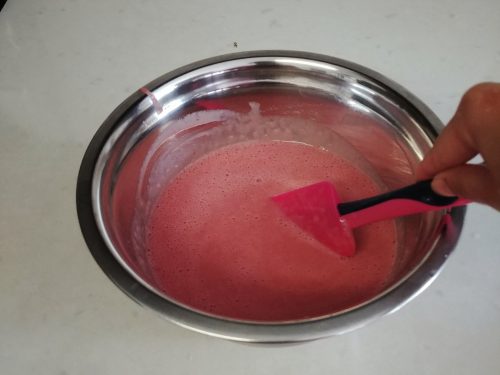
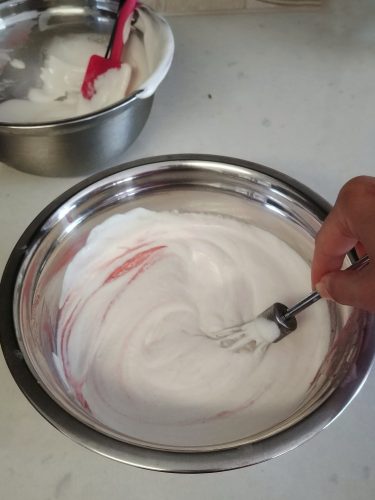
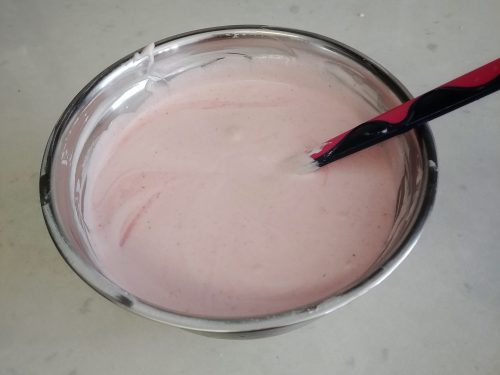
In the chilled mixing bowl, beat whipping cream with a hand mixer until thickened and soft peaks form. Fold into the strawberry-yogurt mixture with a spatula in two batches until incorporated.
淡忌廉放在己雪凍的鋼盆中用電動打蛋器打至稠身呈軟勾狀,分兩次加入士多啤梨乳酪漿中用膠刮以切拌方法拌至顏色均一。
For the Mirror Glaze 鏡面
Bloom gelatin by mixing it with water. Let stand for 5 minutes. Set aside.
魚膠粉加水拌匀靜置五分鐘讓魚膠粉充份吸收水份,備用。
Combine sugar, water and light corn syrup in a saucepan and bring to a boil. Remove from heat and stir in condensed milk.
糖、水及粟膠放小鍋中拌匀,小火煮滾後離火,加入煉奶拌匀。
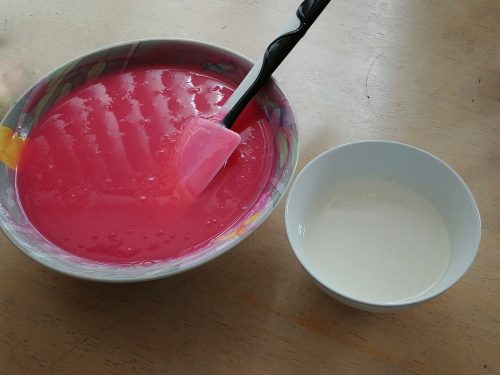
Pour over the white chocolate and add in the bloomed gelatin. Let stand 5 minutes. Stir until smooth while taking care not to incorporate air bubbles. Place 1/4 cup of mixture into a small bowl and stir in white food coloring. Add pink food coloring to the remaining mixture and mix well. Let cool and use at 90°F/32°C.
倒進白朱古力中,加入已發泡的魚膠並靜置五分鐘,慢慢拌匀至順滑,盡量避免產生氣泡,把約1/4 杯淋面醬倒入小碗中,加進白色色膏調成白色,餘下的加入粉紅色色膏調成粉紅色,靜待降溫至90°F/32°C才使用。
Assembly 組合蛋糕
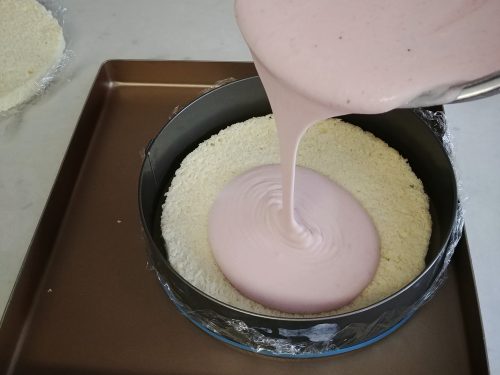
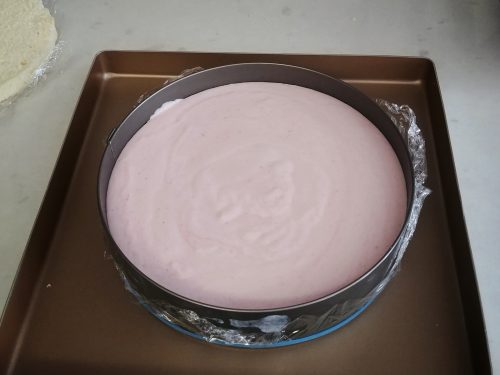
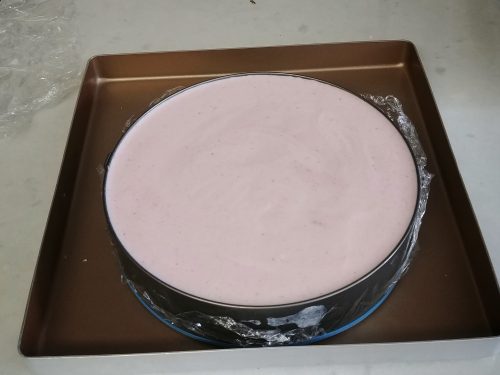
Trim cake layers slightly to approximate 7.5” in diameter. Wrap bottom of the cake ring with plastic wrap. Place a cake layer into the ring. Pour half of the mousse over the cake layer. Top with another cake layer then fill the ring with remaining mousse. Tap ring on the counter several times to remove any large air bubbles. Smooth top with an offset spatula. Place cake in the freezer overnight.
蛋糕片修剪成直徑7.5寸圓形,慕絲圈底部包上保鮮紙,放入一塊蛋糕片 ,倒入一半慕絲後放上另一塊蛋糕片,倒進餘下慕絲,在枱上敲幾下將大氣泡震出後用抹刀抹平表面,放進冰箱冷凍隔夜。
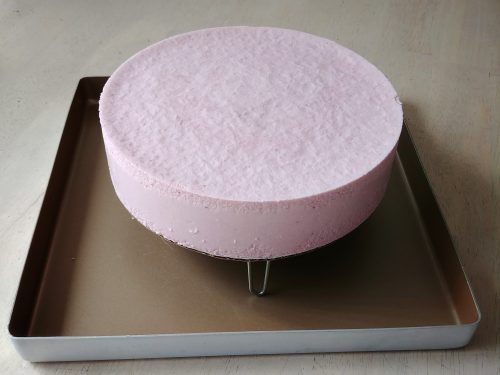
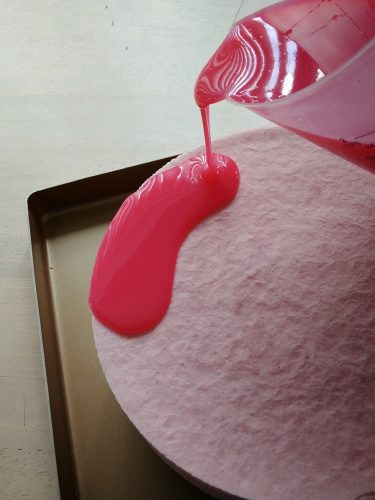
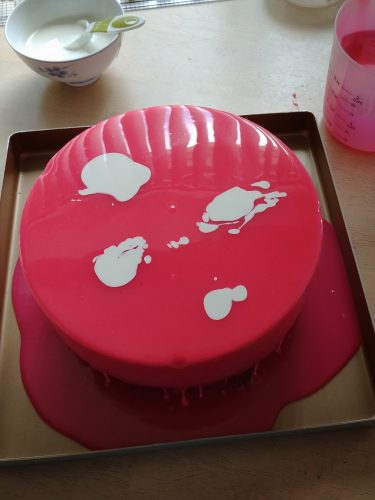
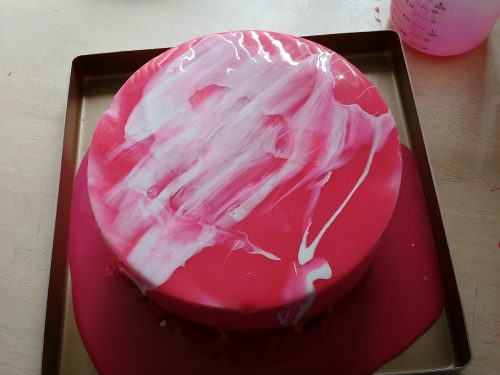
Remove frozen cake from freezer and unmold cake. Place cake on a rack or a bowl then set it on a tray to catch any drips. Pour warm pink mirror glaze over the top of the cake in a circular motion until the cake is entirely covered (extra glaze will drip off from the edges to the tray). Drizzle a few spoonfuls of white glaze on top, alternating with another spoonfuls of pink. To create a marble effect, use a long offset spatula to swipe across the top above the cake. Let sit for 10 minutes then clean the edges and decorate the cake. Transfer cake back to the fridge to set for another 4 to 6 hours before serving.
取出冷凍的蛋糕脫模後放在鋼架或杯子上,下放焗盆收集滴下的淋面,把粉紅色淋面從蛋糕頂部打圈淋在蛋糕上覆蓋表面(剩餘淋面會從蛋糕邊緣掉到焗盆上),用小匙隨意把白色淋面滴在蛋糕表面,再滴上粉紅色淋面,取長曲柄抹刀在粉紅色淋面上輕輕抹過便可形成大理石花紋,待10分鐘至凝固後可用抹刀清理蛋糕邊及加上其他裝飾,把蛋糕放回雪櫃繼續冷藏四至六小時後可享用。
Marble mirror glaze cake
大理石鏡面蛋糕製作
Galaxy mirror glaze cake
星空鏡面蛋糕製作
If you want to republish this recipe, please link back to this post.
版權所有,如需引用,請註明出處
EC Bakes 小意思 Facebook 專頁 www.facebook.com/ECBakes
© Copyright 2017 ecbakes.com

Leave a comment