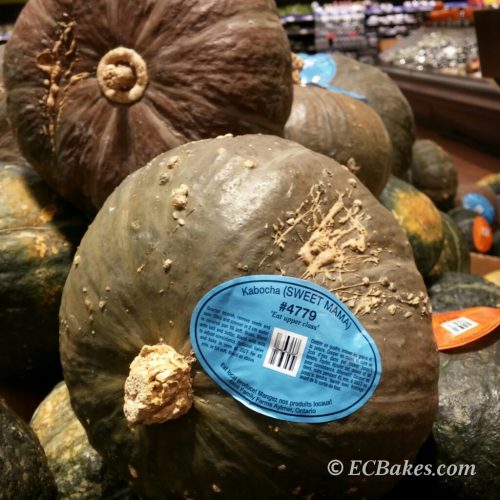
Pumpkin season is here! I’ve baked my first pumpkin pie of the year with kabocha squash last week. I love using kabocha squashes (AKA Japanese pumpkins or Mami squashes) in my baking and treats because of their fluffy texture and natural sweetness. My favorite kind of pie crust is the flaky one and I am sharing with you an all-butter pie crust recipe that doesn’t make use of any vegetable shortening for the flaky texture.
For a crisp, buttery and flaky pie crust, I have the following tricks:
1. Use ice cold butter pieces and water. Flaky pie crust is created by cutting the butter pieces into the flour. When baked, these butter pieces melt, leaving behind an empty hole in the hardened crust which leads to the characteristic of a flaky pie crust. This cannot be achieved when your butter or dough is too soft and cannot hold its shape.
2. Add just enough amount of water. Moisture content of different brands of flour may vary. Add water little by little and stop once a dough can be formed. Your dough will fall apart if there is not enough water. And adding too much water will make your dough sticky and shrink after baking.
3. Chill the dough before rolling and baking in order to keep the butter pieces in its shape.
4. Add warm pie filling to the hot pre-baked pie crust to keep the pie crust crisp . This will drastically shorten the baking time and will prevent the pie crust from turning soggy.
Okay enough writing…so here’s how I make my pie~
南瓜季節又到了!上星期EC用日本南瓜焗製了今季首個南瓜批。EC愛使用日本南瓜做蛋糕甜點,因其味道香甜質地十分綿,批皮方面EC喜愛酥酥鬆鬆的口感,用固體菜油可令批皮鬆脆,可是少了牛油香,EC今天會分享用牛油做出酥脆批皮的方法。
要做出充滿牛油香、口感酥脆的批皮,EC有以下心得:
1. 牛油及水要用冰凍的,酥鬆批皮的形成是靠將牛油粒與麵粉混合成糰,細小的牛油粒在焗爐中溶化後會於硬化的批皮內留下小洞,做成鬆脆口感,若牛油或麵糰過軟則不能做到此效果。
2. 水份份量要準確,不同牌子麵粉受水程度有別,水份要逐少添加,剛能拌至成糰後要立即停止。水份不夠不能成糰,太多則令麵糰黏手,批皮更會縮水。
3. 弄好麵糰及鋪好批皮後要放入雪櫃冷藏確保牛油粒不會過軟。
4. 為了使批皮保持脆口,要將溫暖的餡料倒入已預焗的熱批皮中,這樣做可大大縮短入爐時間,批皮便不會因長期浸在餡料中而變得糊囗。
說了這麼多,以下是做法了~
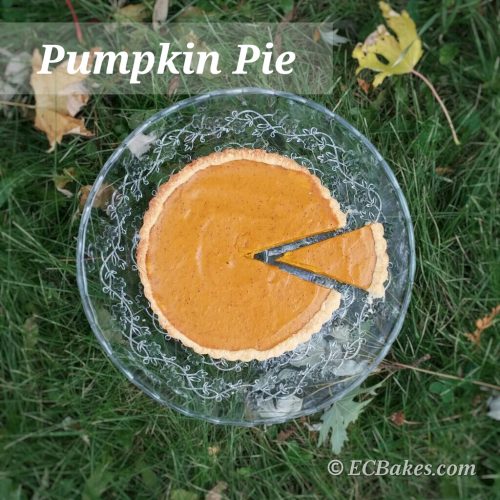
Pumpkin Pie 南瓜批
Makes a 7 to 8 inch pie
可做七至八寸批
Ingredients
For the Pie Crust
135 g all-purpose flour
1 tsp granulated sugar
1/3 tsp salt
100 g unsalted butter, cold and cubed
2 to 3 Tbsp cold water
For the Pie Filling
2 large eggs
1 tsp ground cinnamon
1/4 tsp ground ginger
1/8 tsp ground nutmeg
1/8 tsp salt
120 g whipping cream
1 to 2 Tbsp granulated sugar (or to taste)
1 to 2 Tbsp dark brown sugar (or to taste)
300 g pumpkin puree (I used kabocha squash, see how to make roasted pumpkin puree here)
Notes: The eggs I use are about 50 g each without shells.
材料
批皮
中筋麵粉 135克
細砂糖 1茶匙
鹽 1/3茶匙
無鹽牛油(凍及切丁) 100克
凍水 2至3湯匙
南瓜餡
大蛋 兩隻
肉桂粉 1茶匙
薑粉 1/4茶匙
荳蔻粉 1/8茶匙
鹽 1/8茶匙
淡忌廉 120克
細砂糖 1-2湯匙(可視乎南瓜甜度增減)
黃或黑糖 1-2湯匙(可視乎南瓜甜度增減)
南瓜泥 300克 (EC用日本南瓜,烤南瓜泥做法可到這裡)
註:EC用的大蛋每隻淨重約50克
Directions 做法
For the Pie Filling 南瓜餡
Lightly whisk eggs in a large bowl. Whisk in the spices, sugars, salt and whipping cream until well combined, straining mixture to get rid of any lumps if necessary. Stir in pumpkin puree and mix until smooth.
雞蛋放在大碗內打散,加入香料、糖、鹽及淡忌廉拌匀(如有顆粒可先將混合物過篩一次),加入南瓜泥拌至順滑。
Transfer mixture to a saucepan. Over medium-low heat and with constant stirring (to prevent the eggs from scrambling), cook mixture until it reaches 150°F/65°C on an instant-read thermometer. Remove from heat and keep warm until ready to use.
將餡料倒進小鍋中,用中小火邊煮邊攪拌避免蛋被煮熟,煮至150°F/65°C後離火,保溫備用。
For the Pie Crust 批皮
Cut butter into pieces then place in the freezer for 15 to 20 minutes until firm. Keep water in the fridge until ready to use.
牛油切丁後放進冰箱十五至二十分鐘雪硬,將水放進雪櫃普通格冷藏備用。
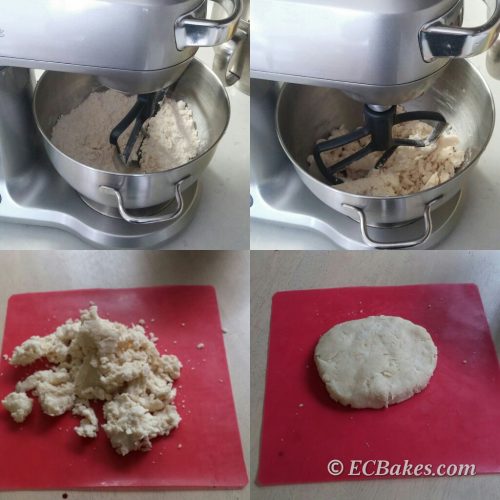
Combine and sift flour, sugar, and salt in a mixing bowl. Stir with a whisk until thoroughly combined. Add in the frozen butter pieces. With a stand mixer fitted with the paddle attachment, mix on slow speed until the butter mixture is pea-sized (you may use a food processor or two knives to cut butter pieces into the flour, or simply rub everything together with your fingertips). If the weather is too warm and butter is becoming soft, place mixing bowl in the fridge for 10 minutes before the next step..
麵粉、糖及鹽混合過篩放入鋼盆中用蛋拂拌勻,加入冰凍牛油丁,用座檯式攪拌器(使用攪拌器配件)以低速將材料攪拌至混合物呈豆般大小(可用食物處理機或兩只餐刀將牛油在粉中切細,甚至用手指頭將所有材料捽碎亦可),若天氣暖牛油開始變軟可將鋼盆放回雪櫃約十分鐘降溫後才繼續操作。
Add cold water to the butter-flour mixture gradually. Keep mixing on the lowest speed and stop adding water when several large clumps have formed. Scrape mixture onto the work surface then press with both hands to form a dough. Add about half a teaspoonful of water and mix again if the dough is crumbly and falls apart. Flatten the dough into a disc. Wrap in plastic food wrap and refrigerate for 30 minutes.
逐少將凍水加進粉油混合物中,慢速拌至材料結成大塊後即可停止,刮出混合物用手輕輕整合即成麵糰(若麵糰太乾不能黏成一團可加半茶匙水同搓至成糰),將麵糰按扁,包上保鮮紙後放入雪櫃冷藏半小時。
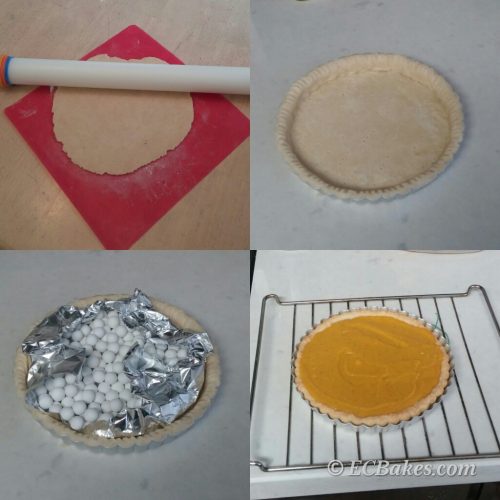
Remove dough from fridge. On a floured work surface, roll dough in a circle about 1/8 thick. Line the pie pan with dough and use your fingers to tuck the dough and fill the crevices. Remove any overhanging dough. Refrigerate for 30 minutes before baking.
從雪櫃取出麵糰,在工作枱上洒上麵粉後將麵糰壓成1/8寸圓形批皮,移到批模內鋪平,用手指整理形狀後切去多餘麵糰,放回雪櫃半小時雪硬。
Preheat oven to 375ºF/190ºC. Prick the pie shell with a fork then line with aluminum foil. Fill foil with pie weights then blind bake for 20 minutes. Remove foil and pie weights and bake for another 10 to 15 minutes until golden brown. I usually start cooking my pie filling when the crust is being baked the second time.
焗爐預熱375ºF/190ºC,用叉在批皮上刺洞,放上錫紙後倒入焗爐珠,焗約二十分鐘後取出,小心除去錫紙及焗爐珠,再焗十至十五分鐘至表面金黃色,EC通常在第二次焗批皮時開始煮南瓜餡。
Remove crust from the oven and cool for a few minutes on a wire rack. Fill hot crust with warm pie filling then smooth top with an offset spatula. Return pie to the oven and bake at 350ºF/180ºC until the filling sets, about 15 minutes in my oven. An instant-read thermometer inserted in the center of pie should register 175ºF/80ºC.
從焗爐取出焗好的批皮在鋼架放涼數分鐘,把温暖的餡料倒進熱批皮中,抹平表面後放回焗爐,將爐溫降至350°F/180ºC,繼續焗至餡料中央凝固,中心温度達175ºF/80ºC後可取出。
Transfer pie to a wire rack to cool.
轉移到鋼架放涼。
Pie crust recipe adapted from The Art and Soul of Baking.
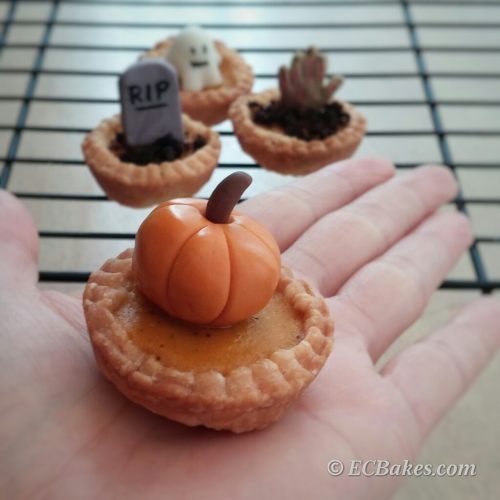
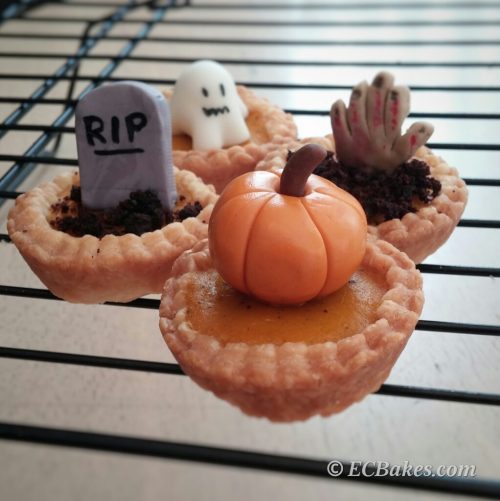
I used my leftover dough and filling to make these bite-sized pumpkin pies. I added Halloween decorations on top. The decorations were made with modeling chocolate.
EC利用餘下的批皮及餡料做了一口南瓜批!上面放了用造型朱古力所作的萬聖節裝飾。
Kabocha squashes
日本南瓜
If you want to republish this recipe, please link back to this post.
版權所有,如需引用,請註明出處
EC Bakes 小意思 Facebook 專頁 www.facebook.com/ECBakes
© Copyright 2015 ecbakes.com

Leave a comment